Internet & Mobile
How to Activate a Korea eSIM on iPhone and Android
Before departure, confirm that the exact phone model and country or carrier variant support eSIM and that the phone is unlocked.
Official-source checked Checked
The listed official sources were checked for this version of the guide.
- Next review
- Change rate
- Reviewed every 30 days
- Sources checked
- 5
Answer in 30 seconds
On iPhone, the current Apple route is Settings → Cellular or Mobile Data → Add eSIM, followed by the provider’s QR code, link, app or manual details. On a current Samsung Galaxy, the route is Settings → Connections → SIM manager → Add eSIM → Scan QR code. Menu wording can vary by model, region and software.
Do not treat installation and plan validity as the same event. Some plans start when the profile installs, others on first network use, first data use, arrival, manual activation or a booked date. Read the exact provider rule before scanning. After landing, set the Korea eSIM as the mobile-data line, prevent unintended data switching to the home SIM, and follow the provider’s roaming and APN instructions.
Never delete an installed eSIM while troubleshooting unless the provider explicitly confirms reissue. Some tourist profiles cannot be restored after deletion.
If you have not chosen a product, start with eSIM vs SIM Card vs Pocket Wi-Fi. If the deciding issue is calls or SMS, read Do You Need a Korean Phone Number in Korea?.
Traveler compatibility
- Korean phone number
- Not required
- Foreign-issued card
- Partially supported
- Korean ID
- Not required
- English support
- Partial English
Traveler compatibility
Swipe or scroll to see all columns.
| Requirement | Current boundary | Check before purchase |
|---|---|---|
| Compatible device | Model, country variant and carrier can matter | Confirm the exact model in device and provider documentation |
| Carrier unlock | Usually required for a separate travel plan | Ask the home carrier before departure |
| Trusted internet | Normally required to download the profile | Keep airport, hotel or companion Wi-Fi as fallback |
| Korean phone number | Depends on the exact plan | Separate data-only, assigned number, incoming SMS and voice |
| Passport | Some tourist products or voice activation require it | Use only the carrier’s official process |
| English support | Provider and device menus vary | Save official instructions and support contact offline |
Before buying: confirm the exact device
Do not rely on the marketing name alone. Record the model number, country or carrier variant, operating-system version, carrier-lock status and whether an EID or Add eSIM control appears. A phone family can contain variants with different eSIM support.
Apple’s current support page lists iPhone XS, XS Max, XR or later as the general starting point, but regional exceptions exist. Samsung states that support can depend on country of origin and carrier. The provider’s own compatibility list can be narrower than the manufacturer’s hardware capability, so all three layers must agree: device, seller and Korean network route.
If any layer is unclear, do not buy a non-refundable plan. Choose a physical SIM with staffed support, pocket Wi-Fi, or home-carrier roaming as a temporary fallback.
Before scanning: save the recovery package
Store the QR code or activation link somewhere the target phone can access without displaying the code to strangers. A printed private copy, encrypted file on another device or secure password-manager note can work. Also save any SM-DP+ address, activation code, APN, order number, plan validity rule and official support link.
Do not post the QR code, EID, IMEI, ICCID, phone number, passport or receipt in a public forum. A QR code may install the paid profile. Crop or redact screenshots before sharing them with anyone other than verified provider support.
Make sure the target phone has enough battery and stable trusted Wi-Fi. Do not begin while boarding a flight or leaving a connection that may drop halfway through download.
Decide whether to install before flying
Read the provider’s exact start trigger. Installation can be safe before departure when the plan starts only on first use in Korea, but that rule is not universal. A short plan that begins on installation can lose paid time before arrival.
LG U+’s current product page says its checked plan calculates the period from first data use and must be activated within the stated validity window. That is a plan-specific rule, not a promise for every eSIM sold for Korea.
If the start trigger is ambiguous, ask the provider in writing or wait until trusted Wi-Fi is available near arrival. Keep the airport route and accommodation address offline in case activation is delayed.
Install on iPhone
Apple documents several carrier-dependent routes. For a QR code after phone setup, open the Camera app and scan the provider code. When Cellular Plan Detected appears, follow the official prompts and add the plan. On recent iOS versions, a QR code received in the default email app or browser may support tap-and-hold followed by Add eSIM.
The settings route is normally Settings → Cellular or Mobile Data → Add eSIM. The provider may instead use carrier activation, a setup link, its official app or manual details. Use the method in the provider order rather than assuming every QR code follows the same screens.
Label the new line Korea. Keep the home line label clear. Do not set the Korea line as mobile data until the provider’s activation rule says it is safe.
Install on Samsung Galaxy
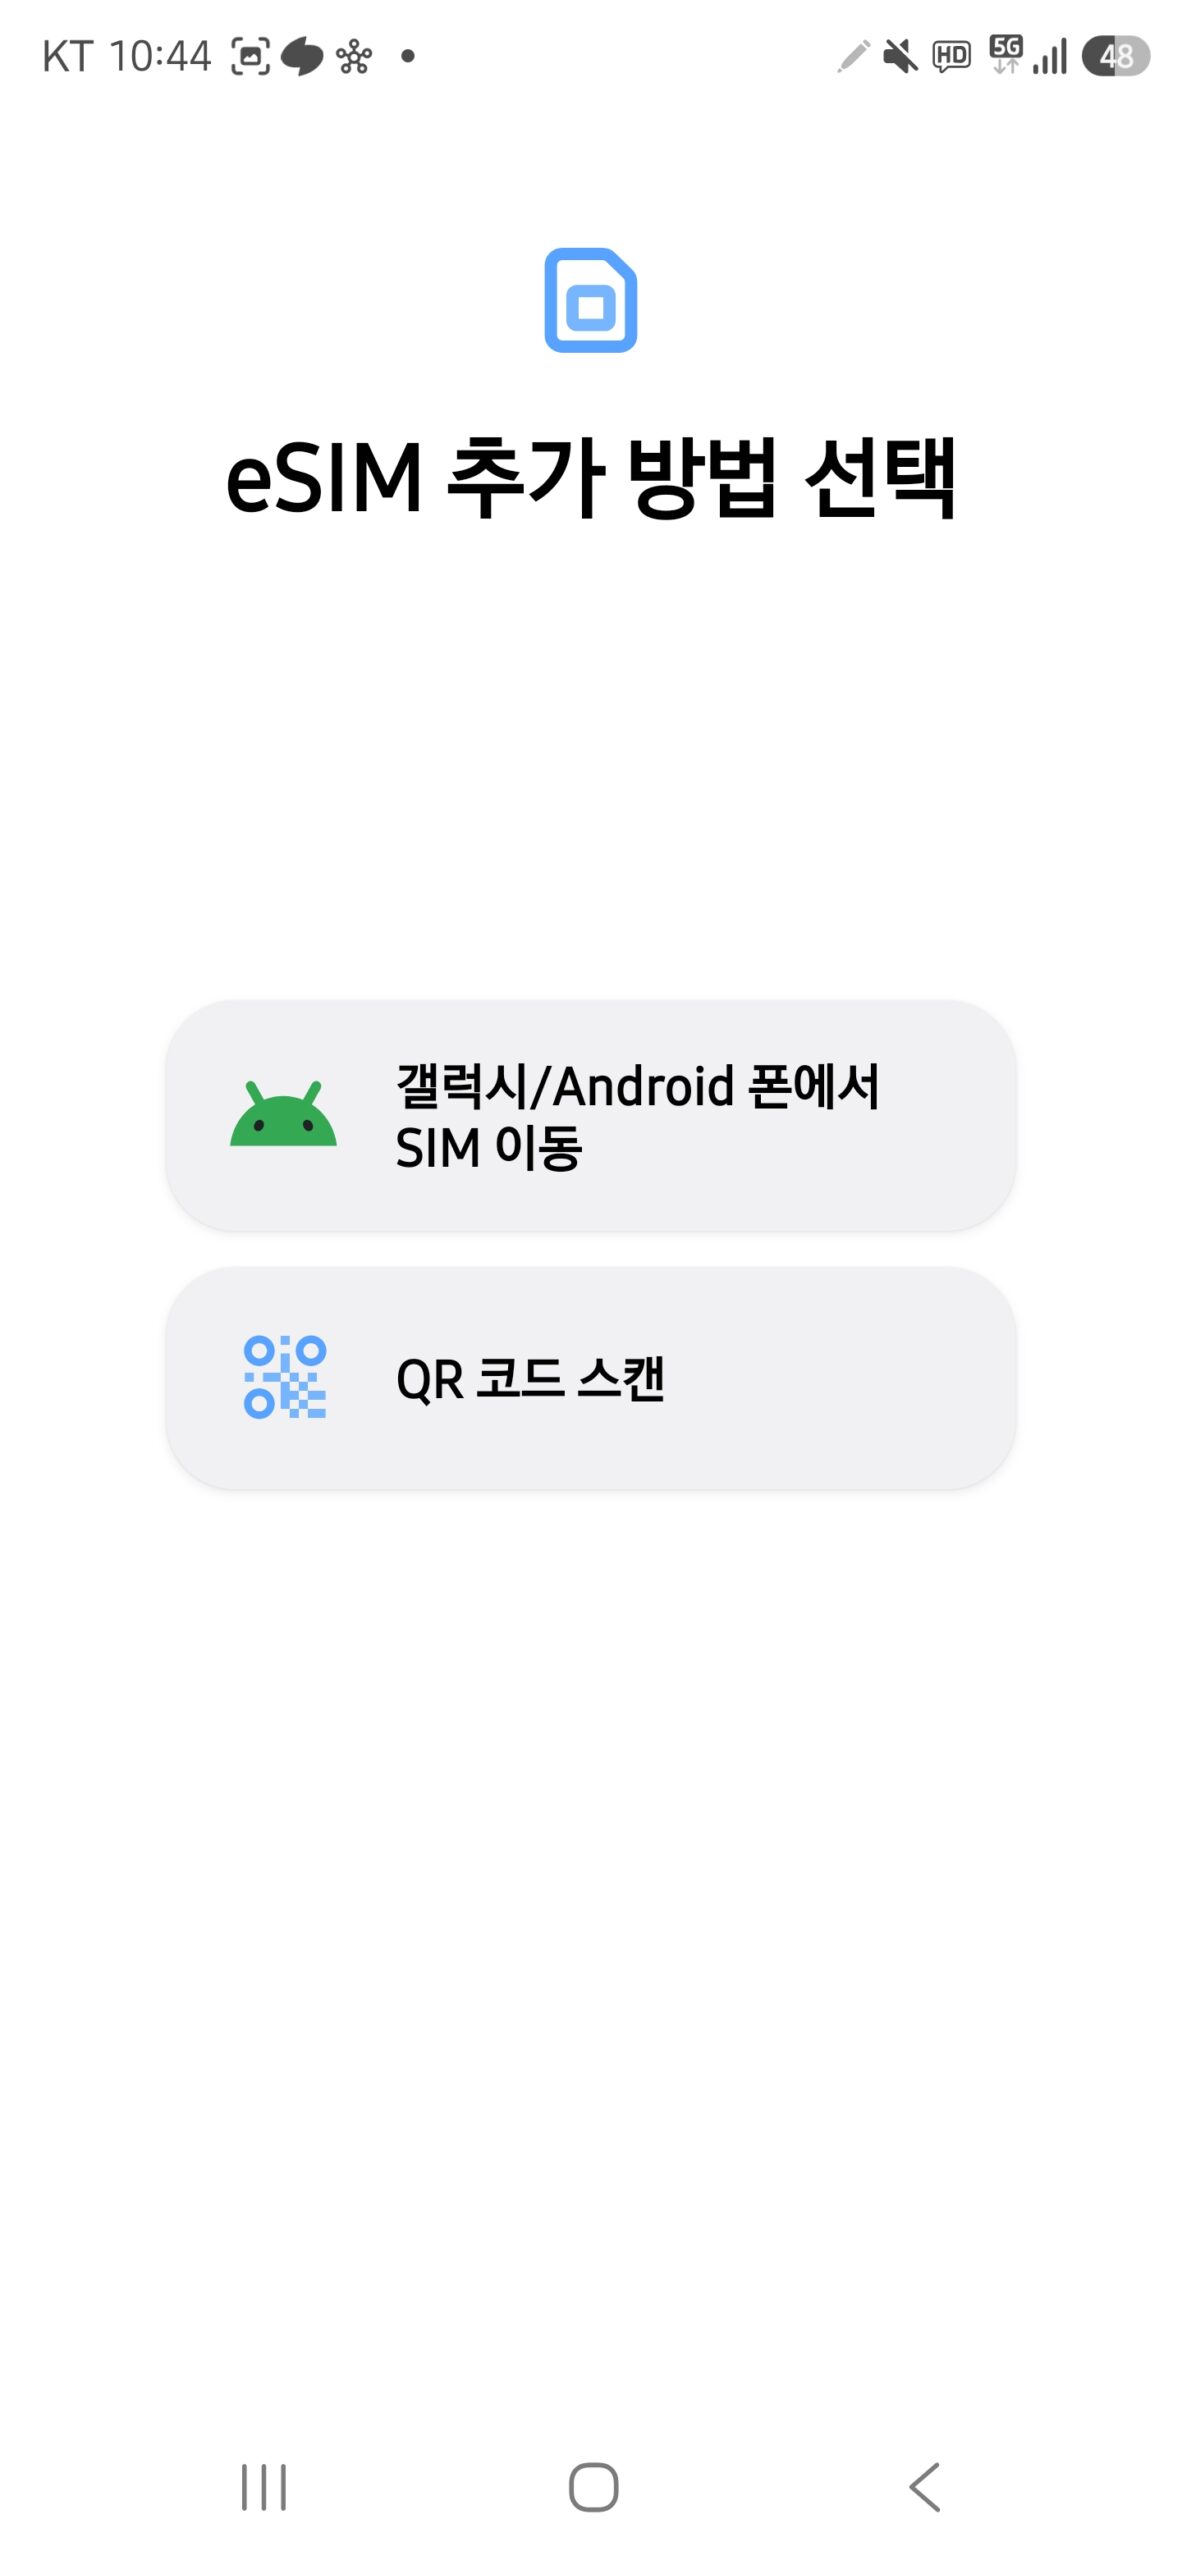
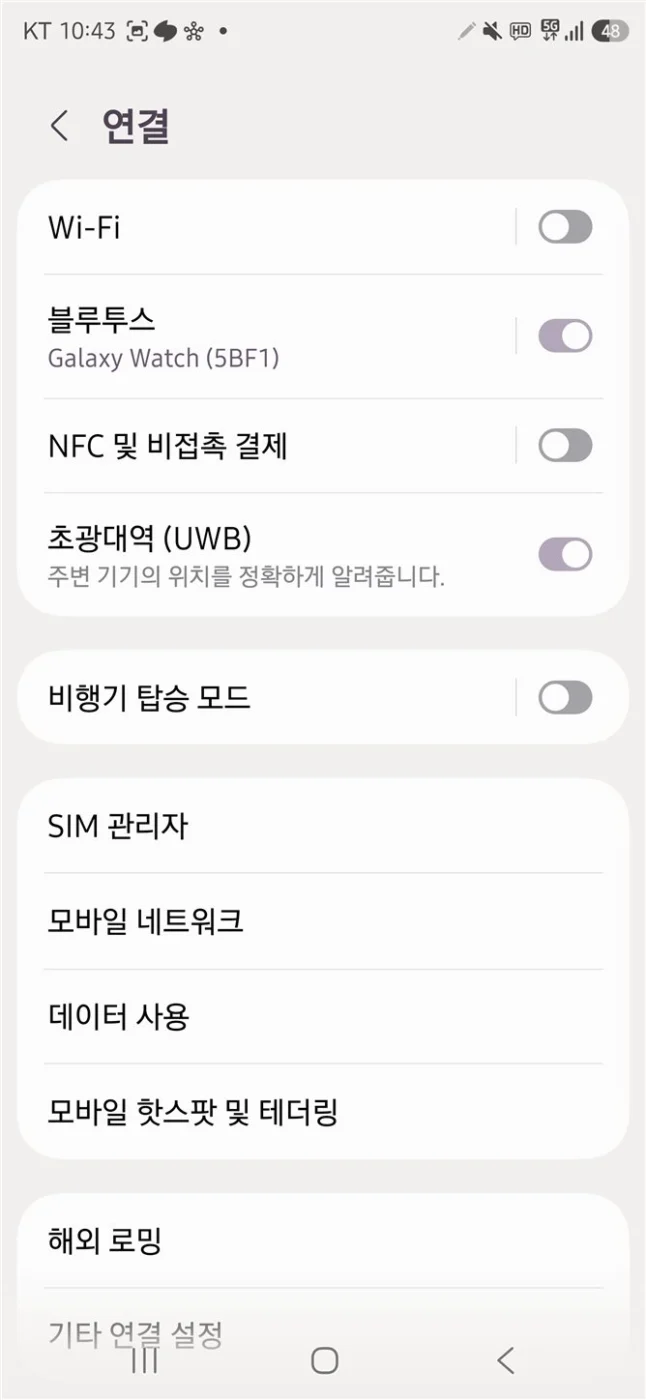
Samsung’s current support route is Settings → Connections → SIM manager → Add eSIM, then Scan QR code for a carrier QR. Some software versions can search for a preassigned plan or offer a transfer route; those are not substitutes for the travel provider’s instructions.
Scan the code, review the provider name and plan prompt, and add the profile. Restart the phone if the manufacturer or provider requires it. Label the profile Korea instead of leaving two lines named SIM 1 and SIM 2.
The author-owned Galaxy image for this Guide shows the Add eSIM options on a current Samsung device. It confirms the menu path only; it does not prove that a particular Korea plan, foreign phone or network will activate.
Install on Google Pixel or another Android phone
On Pixel, current menu wording commonly begins under Settings → Network & internet → SIMs → Add SIM, but device and Android versions differ. Follow Google’s current support and the provider’s compatibility page for the exact model.
Do not infer compatibility from the presence of a scanner alone. Some Korean carrier tourist plans exclude models or foreign variants that otherwise support eSIM hardware. If the provider excludes the device, use another product rather than forcing a manual code.
Activate after arrival
Once the plan’s permitted start condition is met, turn on the Korea line and select it for mobile data. Turn off automatic mobile-data switching if it could move usage to the home SIM. Keep home-line data roaming off unless you intentionally purchased that roaming service.
Enable data roaming on the Korea eSIM only when its provider instructs it. Many travel eSIMs use roaming on a partner network, while a local carrier profile may follow different settings. The word roaming on the phone does not by itself identify the billing model.
Wait for network registration, then test a low-data task: load one current web page, send a message and open a saved map route. Do not declare success from signal bars alone.
APN and network selection
Most current profiles install the APN automatically. Enter or change an APN only when the provider gives the exact value for that plan. Copy spelling, capitalization and punctuation exactly, and do not mix instructions from another seller using a similar network.
Leave automatic network selection on unless official support tells you to choose a named partner. A profile can show signal yet have no data if the wrong line, roaming rule or APN is selected.
Capture privacy-safe screenshots of the line toggle, data-line choice and error message before making several changes. Change one variable at a time so support can identify the cause.
If something goes wrong
Work through this order:
- Reconnect to trusted Wi-Fi and reopen the exact provider instructions.
- Confirm the Korea profile is installed and switched on.
- Confirm mobile data is assigned to the Korea line.
- Prevent automatic data switching to the home line.
- Apply the provider’s exact data-roaming rule.
- Toggle airplane mode once or restart the phone.
- Check the provider’s APN and supported network only if documented.
- Contact official support with the order number and privacy-safe screenshots.
Do not repeatedly rescan the QR code or delete the profile. LG U+’s current page warns that its downloaded eSIM cannot be restored after deletion. Other providers have their own reissue rules.
Failure table
Swipe or scroll to see all columns.
| Symptom | Likely boundary | Safest next action |
|---|---|---|
Add eSIM is missing | Unsupported model, region, software or carrier lock | Confirm the exact model and unlock with the home carrier |
| QR code will not scan | Code displayed on same phone, already used, expired or incomplete | Use the provider’s approved link/manual route or support |
| Profile installs but shows no service | Start condition, unsupported network or incomplete activation | Wait for the valid location/time and contact the provider |
| Signal appears but data fails | Wrong data line, roaming rule or APN | Check one setting at a time against the exact plan |
| Home carrier charges appear | Data switching or home roaming remained active | Turn off home-line data roaming and review the issuer record |
| Profile was deleted | Reissue may be impossible | Stop and contact the seller; do not buy again until confirmed |
Useful Korean phrases
이 휴대폰에서 이심을 사용할 수 있나요?— Can I use an eSIM on this phone?이심이 설치됐지만 데이터가 안 돼요.— The eSIM is installed, but data does not work.데이터 회선을 확인해 주세요.— Please check the mobile-data line.이 요금제는 데이터 로밍을 켜야 하나요?— Does this plan require data roaming to be on?이심을 삭제하지 않고 해결하고 싶어요.— I want to fix this without deleting the eSIM.
Privacy and cost safeguards
Keep the home SIM active only as needed for bank or account messages. Check whether receiving SMS or calls abroad costs money. Do not let a shop or stranger take an unlocked phone out of sight, install remote-control software, or receive authentication codes.
Use the provider’s official support page rather than a contact sent by an unsolicited message. Preserve the order confirmation, plan name, paid dates and screenshots for a refund or service dispute, while hiding all identifiers.
Frequently asked questions
Should I install the eSIM before flying?
Only after confirming the plan’s start trigger. Installation and paid validity are not universally the same event.
Should data roaming be on?
Follow the exact provider. Some travel eSIMs require it; do not apply that rule to every product or the home line.
Can I scan a QR code displayed on the same phone?
Recent systems may support tap-and-hold or an activation link, but save a private copy on another device and follow the provider’s method.
Should I delete and reinstall when data fails?
No, not unless the provider confirms reissue. Work through line, roaming, APN and support checks first.
Official sources
- Apple: Set up eSIM on iPhone — current compatible-device baseline and carrier, QR, link, app and manual activation paths; checked September 2, 2026.
- Samsung: SIM cards and eSIM for Galaxy — current Galaxy QR-code installation and SIM controls; checked September 2, 2026.
- Google Pixel: Use two SIMs — current Pixel eSIM and data-line starting point; checked September 2, 2026.
- LG U+ Korea eSIM — current checked Korean plan compatibility, activation, validity, support and deletion boundaries; checked September 2, 2026.
- VISITKOREA: mobile phone and internet — official visitor connectivity overview; checked September 2, 2026.
Change log
- 2026-09-10 — Added contextual photographs and instructional screenshots with source and privacy notes. This media update does not change the information-verification date or field-test status.
- 2026-09-02 — Check device compatibility, keep the eSIM recovery details, choose the correct data line and avoid deleting an eSIM while troubleshooting.
- 2026-09-02 — Verification scope: No purchase, installation, activation, data session, call or SMS was independently tested for this Guide.